Friday, May 14, 2010


Harvest Elementary
CALL FOR ENTRIES
Annual End of Year Art Show


Hey all you Harvest Artists!  It is time for the end of year arts celebration!  Look through your artworks, or get creative and make something new, and bring it to school to show off your talent!


When do I bring artwork in?  Right away!  Bring it to your classroom teacher.  He/She will help you to hang it or display it properly.

What should I bring?  Any flat (2 dimensional) artwork NOT in a frame.  Construction paper matting is fine, but not necessary.  Any sculpture that can sit easily on a classroom desk placed in the hall.

Can I use artwork from my art class portfolio?  Of course!

What is the deadline for bringing in artwork?  Friday, May 21st.

Who can participate?   ALL HARVEST STUDENTS!

Will I get my artwork back?  Yes!

When is the Art Show?  The art show will be held on Friday, May 21st, from 5:30 pm until 7:00 pm.  Then at 7, we can all head down to the auditorium to watch the choir and orchestra concerts!


So, what are you waiting for!  Bring your artwork in and show the world what it means to be a Harvest Artist!

Thursday, May 13, 2010

The Portrait of My Son


Here is a collage showing the progression of the painting I did of my son. It is done with the very same oil pastels and techniques that the 6th grade students used. I hope to have images of their portraits posted soon! Looking closely, you can see that this technique is a lot like the old 'paint by numbers' paint sets where you simply filled in the shapes with the correct color. The trick is in deciding which colors (or values) should go in each space. We painted these portraits monochromatically to try to make those decisions on values/colors easier for the students.

The final painting is 16"X20" in oil pastel on gray pastel paper. He would probably like to have it titled "My Avatar", or "Smurf", but I named this painting "My Beautiful Blue Boy". Sorry, son. I know boys don't like to be called "beautiful", but you are beautiful to me.

Posted by Picasa

Mrs. Beck's class - Color Harmonies paintings


Posted by Picasa

Thursday, May 6, 2010

Pure/Modified Contour

Sixth graders ... Homework will be due next Monday!  If you were absent the day this homework was assigned, read the rest of this post to learn what you are to do.

The sixth grade homework this week is to try out a training practice to help improve drawing skills.  I call this a training tool, because it is not something an artist would do all by itself, but is good for improving skills.  Think of it like all the exercises a sports team does during practice, or the exercises a ballerina does at the barre.  Running 'ladders' in practice is not the same as playing in a game, but it helps an athlete with speed and quick reflexes.  Plies done at the barre aren't done on stage, but they are neccessary for training technique into muscles.

So.  This training tool is called 'Pure Contour' and 'Modified Contour' drawing.

First of all, what is a contour?

In art, a contour line is a line that represents the surface of an object.  Some contour lines show the edges of objects.  Others show how it curves or bends.  In this assignment, contour lines should represent the edges of every detail of the object being drawn.

A 'Pure Contour' drawing is made by placing your pencil on the paper, then covering it with another paper so you cannot see what you are doing on the paper.

That's right!  You are not supposed to look at your paper AT ALL for this part of the assignment.  Instead, spend every moment looking VERY closely at all the details on the object.  Draw every little detail!

Once you are sure you have drawn everything you can possibly see, slide your hand out from under the top paper; but DON'T PEEK at what you have done!  Not yet!

Now it is time to make a 'Modified Contour' drawing.  Draw the same object a second time on the top paper.  This time, though, you are allowed to "peek" at your drawing on the paper from time to time to make sure the pencil is in the right place.  Remember, though, that you should still spend MOST of your time looking at the object being drawn... not your paper.

After you have finished your 'Modified Contour' drawing, you can lift up the top sheet of paper.  See how goofy the 'Pure Contour' drawing looks?  Go ahead and laugh at it, I always do!  It is not supposed to look good.  It is supposed to help you see all the details you usually miss or skip over in your drawings.

And there you have it.  Two drawings of the same object are due next Monday.  One of the drawings should be done in 'Pure Contour' style, and the other in 'Modified Contour' style.

Monday, May 3, 2010

"Self Portrait" Teacher Example

Last year when the sixth grade made their self portraits, I chose to do a picture of my daughter along side them, so they could see me doing the same thing I assigned to them.

This year, I decided to to a picture of my son!

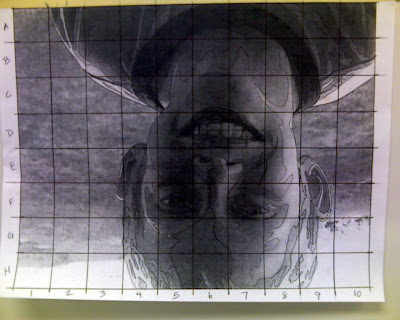
You can see a photo of my son in the top image. Notice that I used a pen to outline all contours... even where value changes occur! And, yes the photo is upside-down on purpose!

In the bottom photo, you can see that I am transferring the image one grid at a time onto a large gray paper that is taped to the front board in the classroom. You can't tell because both photo files are the same size on the web page, but the drawing in the bottom photo is actually twice the size of the original in the upper photo.


Posted by Picasa

Best Student Examples of One Point Perspective


Posted by Picasa

Best Student Examples of Two Point Perspective


Posted by Picasa