Friday, May 14, 2010


Harvest Elementary
CALL FOR ENTRIES
Annual End of Year Art Show


Hey all you Harvest Artists!  It is time for the end of year arts celebration!  Look through your artworks, or get creative and make something new, and bring it to school to show off your talent!


When do I bring artwork in?  Right away!  Bring it to your classroom teacher.  He/She will help you to hang it or display it properly.

What should I bring?  Any flat (2 dimensional) artwork NOT in a frame.  Construction paper matting is fine, but not necessary.  Any sculpture that can sit easily on a classroom desk placed in the hall.

Can I use artwork from my art class portfolio?  Of course!

What is the deadline for bringing in artwork?  Friday, May 21st.

Who can participate?   ALL HARVEST STUDENTS!

Will I get my artwork back?  Yes!

When is the Art Show?  The art show will be held on Friday, May 21st, from 5:30 pm until 7:00 pm.  Then at 7, we can all head down to the auditorium to watch the choir and orchestra concerts!


So, what are you waiting for!  Bring your artwork in and show the world what it means to be a Harvest Artist!

Thursday, May 13, 2010

The Portrait of My Son


Here is a collage showing the progression of the painting I did of my son. It is done with the very same oil pastels and techniques that the 6th grade students used. I hope to have images of their portraits posted soon! Looking closely, you can see that this technique is a lot like the old 'paint by numbers' paint sets where you simply filled in the shapes with the correct color. The trick is in deciding which colors (or values) should go in each space. We painted these portraits monochromatically to try to make those decisions on values/colors easier for the students.

The final painting is 16"X20" in oil pastel on gray pastel paper. He would probably like to have it titled "My Avatar", or "Smurf", but I named this painting "My Beautiful Blue Boy". Sorry, son. I know boys don't like to be called "beautiful", but you are beautiful to me.

Posted by Picasa

Mrs. Beck's class - Color Harmonies paintings


Posted by Picasa

Thursday, May 6, 2010

Pure/Modified Contour

Sixth graders ... Homework will be due next Monday!  If you were absent the day this homework was assigned, read the rest of this post to learn what you are to do.

The sixth grade homework this week is to try out a training practice to help improve drawing skills.  I call this a training tool, because it is not something an artist would do all by itself, but is good for improving skills.  Think of it like all the exercises a sports team does during practice, or the exercises a ballerina does at the barre.  Running 'ladders' in practice is not the same as playing in a game, but it helps an athlete with speed and quick reflexes.  Plies done at the barre aren't done on stage, but they are neccessary for training technique into muscles.

So.  This training tool is called 'Pure Contour' and 'Modified Contour' drawing.

First of all, what is a contour?

In art, a contour line is a line that represents the surface of an object.  Some contour lines show the edges of objects.  Others show how it curves or bends.  In this assignment, contour lines should represent the edges of every detail of the object being drawn.

A 'Pure Contour' drawing is made by placing your pencil on the paper, then covering it with another paper so you cannot see what you are doing on the paper.

That's right!  You are not supposed to look at your paper AT ALL for this part of the assignment.  Instead, spend every moment looking VERY closely at all the details on the object.  Draw every little detail!

Once you are sure you have drawn everything you can possibly see, slide your hand out from under the top paper; but DON'T PEEK at what you have done!  Not yet!

Now it is time to make a 'Modified Contour' drawing.  Draw the same object a second time on the top paper.  This time, though, you are allowed to "peek" at your drawing on the paper from time to time to make sure the pencil is in the right place.  Remember, though, that you should still spend MOST of your time looking at the object being drawn... not your paper.

After you have finished your 'Modified Contour' drawing, you can lift up the top sheet of paper.  See how goofy the 'Pure Contour' drawing looks?  Go ahead and laugh at it, I always do!  It is not supposed to look good.  It is supposed to help you see all the details you usually miss or skip over in your drawings.

And there you have it.  Two drawings of the same object are due next Monday.  One of the drawings should be done in 'Pure Contour' style, and the other in 'Modified Contour' style.

Monday, May 3, 2010

"Self Portrait" Teacher Example

Last year when the sixth grade made their self portraits, I chose to do a picture of my daughter along side them, so they could see me doing the same thing I assigned to them.

This year, I decided to to a picture of my son!

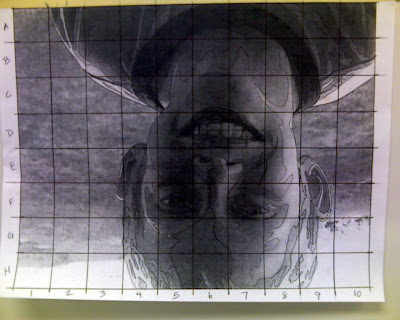
You can see a photo of my son in the top image. Notice that I used a pen to outline all contours... even where value changes occur! And, yes the photo is upside-down on purpose!

In the bottom photo, you can see that I am transferring the image one grid at a time onto a large gray paper that is taped to the front board in the classroom. You can't tell because both photo files are the same size on the web page, but the drawing in the bottom photo is actually twice the size of the original in the upper photo.


Posted by Picasa

Best Student Examples of One Point Perspective


Posted by Picasa

Best Student Examples of Two Point Perspective


Posted by Picasa

Thursday, April 29, 2010

6th grade - Self portraits and the Durer grid


Albrecht Durer was an artist during the Northern Renaissance. He came up with a grid system for accurately re-creating an image. His grid was built out of wood and wire so that he could stand it up between himself and the object he intended to draw. He then created a grid on his canvas to match the grid on the table.


Here is what his grid looked like...


In class, we are using the grid system to transfer a photo of ourselves onto the drawing paper. The image has a grid labelled with numbers and letters. The drawing paper has a matching grid. We are also drawing the image UPSIDE DOWN! This allows the brain to focus on the lines and shapes instead of on the fact that it is an image of a person.

The example below demonstrates with a line drawing of a bunny.

This project will take 1 1/2 to 2 weeks to complete!  Next, we paint it!

Tuesday, April 13, 2010

Famous artworks that use One Point Perspective


The Last Supper
(Convent of Sta. Maria delle Grazie, Milan, Italy (1498), by Leonardo da Vinci).

Can you find the vanishing point?  It is right behind Jesus' head.  Leonardo designed the painting so that every line in it leads your eye to the most important person in the picture.

Here is some art history 'gossip' for you!  Leonardo da Vinci as more than just a painter.  He was a scientist, a mathematician, a scholar, and an inventor!  He was always full of some new idea.  He decided to play around with inventing a new method of painting frescoes (paintings on a plaster wall).  He used this new idea to paint The Last Supper.  Unfortunately, it wasn't a good idea after all and the painting started to flake off the wall after only a few years!  The people who hired him were really mad!

The photo above is actually a cleaned up version of the painting.  Here is what it looked like before repairs were done.


*****


The School of Athens
Artist Raphael
Year 1509–1510
Type Fresco
Dimensions 500 cm × 770 cm (200 in × 300 in)
Location Apostolic Palace, Rome, Vatican City

Here is some more Art History 'gossip'.  Raphael was very popular with the social crowd.  He always dressed very well and wore expensive colognes.  He went to all the parties!

Michelangelo (the painter and sculptor) lived at the same time and in the same place.  He was not popular with the social crowd.  He was invited to the parties, but he chose not to go.  Instead, he liked to stay up all night carving on marble sculptures.  He would strap a candle to his forhead (so the light wouldn't throw a shadow on his work), which would drip wax into his hair.  Then the marble dust would settle into the wax.  He would be all stinky, sweaty, and dirty in the morning wondering around town.

Raphael and Michelangelo DID NOT like each other!  Raphael painted Michelangelo into his painting, The School of Athens.  Can you find him?  Hint, he looks very grumpy.  Yes!  He is at the bottom, sitting on the steps.

*****


A Woman Drinking with Two Men
by Pieter de Hooch
c . 1658
Oil on canvas, 73,7 x 64,6
National Gallery, London
Look at the tiles in the floor!  And the rafters in the ceiling.  And the window.  There are lots of things in this painting that use one point perspective!

Investigation has shown that de Hooch first drew the one-point perspective scheme and then added the figures. At an early stage, a man appeared to the left of the female servant. De Hooch later painted him out, but his outline has become visible as the upper paint layers have become more transparent over time.


Saturday, April 3, 2010

Extra Credit!


I just had to share this great example of what you can do on your own with what you have learned in art class!

This picture was made by a 5th grade student on his own time. It was not an assignment from me! I was most impressed! He now gets to turn it in for extra credit and I would encourage all my students to follow his example.
Posted by Picasa

5th grade still life


The fifth grade took two days to draw and shade the same still life the 6th grade was assigned. This sort of practice in drawing is really critical in developing artistically! We will be doing the same lessons next year, plus a few extra lessons to help make the drawings even more accurate! Keep drawing! Keep practicing!
Posted by Picasa

6th grade still life


At the end of the drawing unit, I arranged a still life of simple forms for the students. We spent two days on drawing and shading it. I think they turned out really great!

I know that drawing and shading some rather boring objects in the art room is not necessarily exciting. But remember, if you can draw and shade these objects successfully, you can then take what you learned and use it to draw whatever you want!
Posted by Picasa

Wednesday, March 31, 2010

Drawing a still life


The third grade has been having drawing lessons this week!

First, each student chose one object out of the 'still life bins'. After drawing it enough times to see improvement, a student would then return the object and choose another to practice with. The goal was to try to get the sizes and shapes right, then add the details!

The next lesson was an arrangement of objects on the center table. In this lesson, the objects had to be drawn in relation to each other. That means drawing things in front and things in back. The objects in front should be lower on the paper than the things in back. Also, students were taught that they can compare where objects seem to 'touch' each other, so they will know how big, little, tall, short, fat, or thin each item should be compared to the other items. This is a fun, but very challenging assignment. To practice at home, collect some items from the kitchen and set them up on the table. Now, draw them! Practice, practice, practice!
Posted by Picasa

Shading a Cylinder


The fifth grade spent today expanding their shading skills to a more difficult subject; a shiny #10 can! There is a ton more detail to work out on this than there was on a simple sphere. They were really up to the challenge, though, and did a fantastic job! Congratulations on a job well done! Don't forget to practice tons and tons at home.
Posted by Picasa

Tuesday, March 30, 2010

6th Grade Name Tags


Here is a collection of the most creative name tags created by this year's 6th grade students. Congratulations!
Posted by Picasa

Monday, March 29, 2010

Drawing Lessons - Negative Space


On Monday, the 6th grade classes had their first drawing lesson of the year. The first lesson was on Negative Space Drawing.

Negative Space is the space around the object you intend to draw. It forms shapes that you can use to help you make your drawing more accurate. Above is an example of negative space drawing. In class, I placed a pile of pencils and scissors onto a black paper. The object of the assignment is to draw the space AROUND the pencils and scissors... NOT the pencils and scissors!

Once you get good at seeing negative space, you can combine it with regular drawing techniques to make really accurate drawings!

It takes a bit of a mental shift to see the space around things as something you can actually focus on as shapes to draw; but once you make that shift, it is really fun to do!
Posted by Picasa

Thursday, March 25, 2010

A quick reminder!

SIXTH GRADERS!  YOUR NAME TAG HOMEWORK ASSIGNMENT IS DUE

TOMORROW!

DON'T FORGET!

Tuesday, March 23, 2010

HOMEWORK - NAME TAG

Welcome back 6th graders!  It is good to have you in the art room for this final term of the 09-10 school year.

Your first homework assignment is to complete a name tag.  It should be done artistically.  You are welcome to research fun fonts on your own computer for ideas, or you can get even more creative by using your own interests to draw and shape the letters. 

Remember, the main purpose of a name tag is for others to easily read your name, so it that is your main goal with this assignment as well!

THIS HOMEWORK ASSIGNMENT WILL BE DUE FRIDAY, MARCH 26!

Points will be awarded as follows;

5 pts. for turning it in on time
3 pts. for neatness and ease of reading
2 pts. for creativity
10 pts, total
+5 pts. extra credit for doing both sides
15 pts. possible

Thursday, March 18, 2010

An intro to the Principles of Design


Our final 'project' for fourth grade this year was an introduction to the Principles of Design.

First I should mention that the students already know the Elements of Design. Those are the basic building blocks of art. The Elements of Design are:

Shape, Line, Color, Texture, Value, Space, and Form.

Just knowing what the elements are is not going to guarantee a successful artwork. That is where the principles come in...

The Principles of Design are the rules for using these elements well.

The Principles of Design are:

Balance, Proportion, Unity, Variety, Pattern/Rhythm, Movement, and Focal Point.


Over the next couple of years (in 5th and 6th grade) the students will learn more about these principles and how to manipulate them to make their artwork look more amazing than ever before!

Because this was just an introduction, this assignment was not graded.

I have had lots of fun with my fourth grade classes this year and I look forward to more adventures with them next year!
Posted by Picasa

Kindergarten - Week 10


This is our final week of art lessons for the Kindergarten classes! I want to thank the Kindergarteners for their sweet and friendly ways. I look forward to seeing all of them much more next year in the first grade classes!

This week we talked about how to draw things in relative sizes. That means drawing big things, medium things, small things, and tiny things. Often at this age, children will draw things in sizes that represent how important it is to the child. For instance, family drawings often show the artist (the child) as the biggest. The mother is usually the next in size, and the rest of the family gets even smaller.

Look for a drawing to come home that has items in the correct relative sizes. An elephant that is much bigger than the mouse. That sort of thing!
Posted by Picasa