All classes in grades 4 through 6th work on this simple still life assignment. Each year the students get older, you can see improvement in their work.
The goal of this assignment is to draw the objects in correct proportion in relation to each other, then shade them as accurately as possible to make them look 3-D.
Here are some examples of the best of the student work!
Showing posts with label 6th. Show all posts
Tuesday, April 24, 2012
Wednesday, April 18, 2012
Tuesday, April 17, 2012
6th grade self portraits
The sixth grade classes starting to work on oil pastel painted self portraits. In the past, I have had the students create a grid across the black and white photo, then slowly transfer the image by drawing the lines and shapes found in each square in the grid onto grid squares on their drawing paper. However, I found that the grid drawings take a LONG time. Too long! So, we have taken a short cut and left out the drawing aspect of the project.
Instead, we are simply going straight to the painting step of the project. Here are the steps as we followed them:
- After receiving an 8" x 10" black and white photo of themselves on plain copy paper, students use a pencil to outline every value change they can identify in the image.
- Then students create a 5 level value scale in black and white.
- Next, students select one to three colors of oil pastel, a black, and a white.
- Using the oil pastels, they create a color scale right on the gray scale that matches each value.
- Now students can use the value scale to select the right paint value to go in each area that they outlined in the beginning and paint RIGHT ON THE PHOTO!
Tuesday, January 3, 2012
6th grade - Two Point Perspective
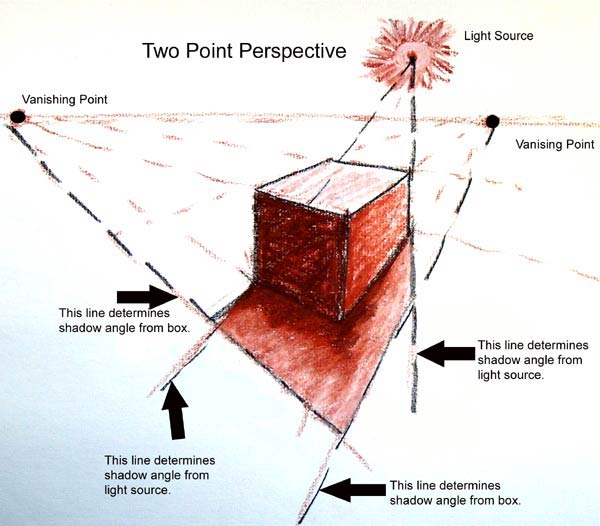
Two point perspective is the next step after you master one point perspective. This perspective happens when you are looking at an edge of an object. When this happens, the object appears to be connected to two vanishing points on the horizon line that are wide spread. Two point perspectivce actually looks more real to life than one point because people see things from an edge (called an oblique angle) more often than head on (as in one point perspective).
The image above demonstrates how to create 2-point perspective. Below is a drawing using two point perspective.
Since there is one point perspective and two point perspective, can there be more vanishing points?
YES!
Technically, you can use an infinite number of vanishing points. This works really well if the furniture in your room is not all lined up with the walls.
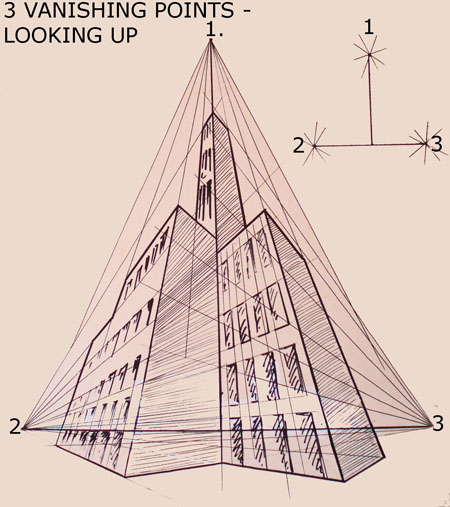
There is also something called 3 point perspective.
This is useful for drawing a skyscrapper from the viewpoint of a pedestrian on the sidewalk, or a sun shadow being cast by a building.
Friday, December 16, 2011
Mrs. Watson's still life
Of course, I won't ask my students to do something that I am not willing to do myself! Here is the still life I made while the students made theirs. This was done on a large sheet of gray paper taped onto the front board. I used crayon, so there was no erasing allowed for me! Fortunately for the students, they got to use pencils... and erasers!
Friday, December 9, 2011
proportion
Proportion means making sure each of the parts are the right size to be correct for the whole. The best way to describe it is to imagine you are drawing a picture of a person. If you were drawing a person, the arms should not be too long or too short. It means making sure the head is not too big or too small for the body. That sort of thing.
In class, each student selected an object out of the still life bins and practiced drawing in proportion. They practiced doing basic comparison measuring to try to get the sizes right. Comparison measuring means that you 'measure' the short side with your fingers, and compare that to the other sides. If the short side counts as 'one', and the long side equals 3 of that 'one', you know to make it 3 times longer than the short side.
To work on this at home, select simple objects in the kitchen to draw. A pot or pan works great!
Thursday, December 8, 2011
Shading a Ball reference photos
Here are some shots of the ball that the students looked at while learning to shade. As you can see, the angle of the light really affects how the shading needs to be done! If you want more practice, you can look at these photos and sketch in the shapes you see created by the effect of light and shadow.
Shading a Ball - Student Examples
Here are some 6th grade examples of shading a sphere. It is fun to look at all the different angles of light and shadow in each picture. This is due to the fact that the ball was placed in the center of the room, with all the students sitting around it. Everyone had a different viewpoint.
Tuesday, December 6, 2011
4th grade - Shading a ball
We started a shading lesson today. Shading involves the Element of VALUE. We also use the Element of SHAPE while working out where the lights and darks in the picture are placed.
I placed a playground ball on the center table in class and illuminated it with a lamp. We talked about using the Element of SHAPE to lightly sketch in the shapes formed by the shadow on the table, the shadows on the ball, and even the dull light bouncing up on the back side of the ball from the table.
Students had an opportunity to walk around the room and see how the shadow shapes change on the ball depending on the angle you are viewing it.
6th grade - Color Wheel HOMEWORK!!!

Today I handed out the next homework assignment. It is a color wheel to fill out at home. You can use whatever coloring supplies you have on hand at home.
There are 3 rings on the color wheel. The outer ring should be the colors tinted, the middle ring is the pure hue, and the inner ring is the color shaded.
There are examples below of what it should look like in the 4 most common mediums (art supplies), crayon, colored pencil, markers, and watercolor paints.
If you lose your copy, click on the image and print a new one!
Subscribe to:
Posts (Atom)