Showing posts with label Teacher - Miss Albaugh. Show all posts

Tuesday, April 17, 2012

6th grade self portraits


The sixth grade classes starting to work on oil pastel painted self portraits.  In the past, I have had the students create a grid across the black and white photo, then slowly transfer the image by drawing the lines and shapes found in each square in the grid onto grid squares on their drawing paper.  However, I found that the grid drawings take a LONG time.  Too long!  So, we have taken a short cut and left out the drawing aspect of the project.

Instead, we are simply going straight to the painting step of the project.  Here are the steps as we followed them:

  • After receiving an 8" x 10" black and white photo of themselves on plain copy paper, students use a pencil to outline every value change they can identify in the image.  
  • Then students create a 5 level value scale in black and white. 
  • Next, students select one to three colors of oil pastel, a black, and a white.
  • Using the oil pastels, they create a color scale right on the gray scale that matches each value.
  • Now students can use the value scale to select the right paint value to go in each area that they outlined in the beginning and paint RIGHT ON THE PHOTO!

Tuesday, January 3, 2012

6th grade - Two Point Perspective


Two point perspective is the next step after you master one point perspective.  This perspective happens when you are looking at an edge of an object.  When this happens, the object appears to be connected to two vanishing points on the horizon line that are wide spread.  Two point perspectivce actually looks more real to life than one point because people see things from an edge (called an oblique angle) more often than head on (as in one point perspective).

The image above demonstrates how to create 2-point perspective.  Below is a drawing using two point perspective.


Since there is one point perspective and two point perspective, can there be more vanishing points?


YES!

Technically, you can use an infinite number of vanishing points.  This works really well if the furniture in your room is not all lined up with the walls.


There is also something called 3 point perspective. 


This is useful for drawing a skyscrapper from the viewpoint of a pedestrian on the sidewalk, or a sun shadow being cast by a building.

Friday, December 16, 2011

Mrs. Watson's still life


Of course, I won't ask my students to do something that I am not willing to do myself! Here is the still life I made while the students made theirs. This was done on a large sheet of gray paper taped onto the front board. I used crayon, so there was no erasing allowed for me! Fortunately for the students, they got to use pencils... and erasers!
Posted by Picasa

Friday, October 28, 2011

6th grade Halloween Portraits

There is an amazingly fun website called Picnik.com.  It is an online photo editing program.  There are three levels to it.

  1. Free play as a guest and upload one photo at a time.  The functions are limited but still quite fun.
  2. Free registered users get to upload 5 photos at a time, but the functions are still limited.
  3. Premium users pay an annual fee.  They can upload and work with up to 100 photos at a time, and all functions and features are unlocked for endless possibilities!
Miss Albaugh's 6th grade class had the opportunity this week to sit down with a class set of Mac iBooks and play with picnik.com.  Each student first took a self portrait using a program on the computer called Photo Booth.  Then they imported the Photo Booth shot into picnik.com and modified and edited using the most free and basic version to create a HALLOWEEN PORTRAIT!  Ah!  They had so much fun!

Here are the results!


Notes to other art teachers who may be thinking of doing this project:
  • Make sure you know the ins and outs of picnik before setting your students loose in it!
  • Spend at least 30 minutes demonstrating all the functions and how to undo.  A computer projector works great for this.
  • If you can't get a class set of computers brought into your classroom, but can get some computers, set up groups of students in group portraits and let them each edit themselves in the group shot.
  • Be aware of your airport's capabilities.  We had enough computers for each child, but the airport couldn't support that many online all at once in my classroom, so a few had to share.
  • It can be chaotic trying to orchestrate that many students in an online program, especially if there is a wide range of computing abilities in the group.  
  • In the event that the computer freezes mid edit, you can shut down the web browser and 'restart'. Picnik recognizes and reloads your last permutation. 
  • Picnik has a wide range of 'save and share' options.  Having the students e-mail their final project to me was the easiest way for them to "turn it in".

Friday, October 7, 2011

6th grade - Self Portraits - Student Work

Here are Miss Albaugh's class self portraits!


If you do not see your portrait here, it is because it hasn't been turned in, yet!  Hurry and get it in so you can receive your grade!

Wednesday, September 21, 2011

6th grade - Miss Albaugh's Class Two Point Perspective Student Examples


6th grade - Mandala


Mandala is a Sanskrit word for 'circle'.  Mandalas can be found in many cultures around the world, from Buddhist meditation circles, to Navajo sand circle art, to circular walking labyrinths used to center the mind.  Even Christian Rose Windows have their historical foundations in Mandalas.

To learn more about Mandalas, I invite you to visit the Mandala Project, where you can see many beautiful examples of mandalas from artists all over the world!


Friday, August 26, 2011

The Principles of Design

...are the rules for using the Elements of Design well.

There are seven Principles (just like there are seven Elements).  They are;

Balance, Unity, Pattern/Rhythm, Variety, Proportion, Movement, and Emphasis/Focal Point.

 Balance

In visual art, balance refers to the visual weight of the objects in the picture.  If there are too many elements on one side, and not enough on the other, the picture does not feel balanced.


Unity

This means that everything in the picture feels like it belongs there.  An example of a picture that does not have unity would be a hot summer beach with a snowman on it.


Pattern/Rhythm

We have all known what pattern is since we were in kindergarten.  It is a set of repeating elements.  Rhythm is a complicated pattern.  Human beings are attracted to pattern and rhythm.  We crave it.  That is why we make and listen to music!  If you can create pattern or rhythm in your artwork, people will be drawn to it.


Variety

"Variety is the Spice of Life".  Ever heard that old phrase?  Although it is cheesy, it is also true!  You don't want to bore your viewers with too much of the same thing.  Try using different sizes, shapes, colors, or lines to give your work more variety!


Proportion

This means that each of the parts are the right size to belong to the whole.  This is very difficult to describe, but very easy to recognize.  In cartoons, the characters are usually out of proportion.  The head is too big, the legs are too small; that sort of thing.  That doesn't mean that cartoon artists are stupid and don't know proper proportion!  It just means that they know the rules of proportion and are breaking them on purpose!  If you want to be a cartoon artist, I recommend that you first learn the rules of proportion, so you can do a better job of breaking them when you need to.


Movement

This does not mean that the stuff on your picture moves around!  Movement refers to what the viewers' eyes are doing when looking at your picture.  You want to keep the viewer looking at your artwork for as long as possible, so you should try to design your picture to lead the viewers' eyes around in it.  This is NOT easy!


Emphasis/Focal Point

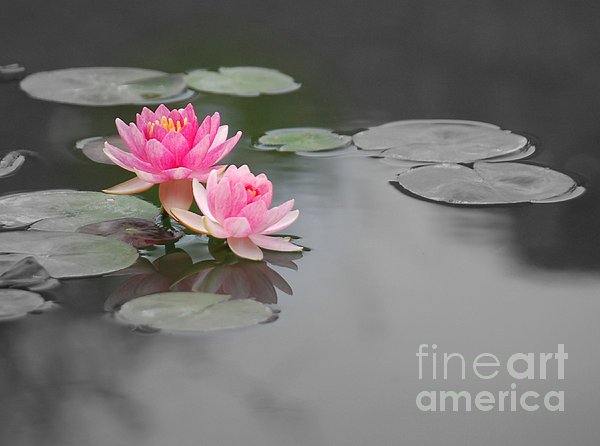
This is the most important thing in the picture.  It is the thing you want the viewer to look at first!  You should manipulate the elements so that the viewer's eye is drawn to it like a magnet.  Notice in the picture above that your eyes are drawn to the pink flowers because the are so strongly different in color from everything else in the picture.
Be careful putting people in your picture unless you want them to be part of the focal point.  We are drawn to the human figure, so most viewers tend to look at people in a picture first.