Showing posts with label drawing lessons. Show all posts
Showing posts with label drawing lessons. Show all posts
Tuesday, April 24, 2012
Still Life Assignment
All classes in grades 4 through 6th work on this simple still life assignment. Each year the students get older, you can see improvement in their work.
The goal of this assignment is to draw the objects in correct proportion in relation to each other, then shade them as accurately as possible to make them look 3-D.
Here are some examples of the best of the student work!
The goal of this assignment is to draw the objects in correct proportion in relation to each other, then shade them as accurately as possible to make them look 3-D.
Here are some examples of the best of the student work!
Saturday, April 21, 2012
5th grade - One point perspective
The visual art element of space means to create a feeling of depth in an artwork. When you are working with a flat piece of paper, it is good to know all the techniques that make it possible to create the illusion of depth. This week, the 5th grade classes are going to work on the concept of one point perspective. But to do so, we need to know some vocabulary.
A level line where water or land seems to end and the sky begins. (most definitions are courtesy of http://www.artlex.com/)
Okay! So, right now you are probably thinking to yourself, 'is this an art lesson, or a math class?!?'
It is both! Besides knowing about art, an artist needs to be a mathmatician, a scientist, and an historian! Being a musician wouldn't hurt, either. So pay attention in your other subjects. It will help you in art!
Alright, back to the lesson.
ONE POINT PERSPECTIVE drawing means that all of the objects in the picture are lined up with only one vanishing point. Imagine looking down a long hallway...
A level line where water or land seems to end and the sky begins. (most definitions are courtesy of http://www.artlex.com/)
The point at which objects moving away from you (getting smaller and smaller) appear to vanish. This point is usually found on the horizon line. There are an infinite number of vanishing points.
Straight and flat across, parallel to the horizon. Notice the similarity between horizon line and horizontal?
The direction going straight up and down; the opposite of (or perpendicular to) horizontal.
Two or more straight lines or edges on the same plane that do not intersect. That means they never touch or cross.
Intersecting at or forming right angles. A right angle is a 90* angle.
Okay! So, right now you are probably thinking to yourself, 'is this an art lesson, or a math class?!?'
It is both! Besides knowing about art, an artist needs to be a mathmatician, a scientist, and an historian! Being a musician wouldn't hurt, either. So pay attention in your other subjects. It will help you in art!
Alright, back to the lesson.
ONE POINT PERSPECTIVE drawing means that all of the objects in the picture are lined up with only one vanishing point. Imagine looking down a long hallway...
Everything seems to come to one point in the center.
To create this effect, draw a horizon line and put one dot somewhere in or near the middle. Use this vanishing point to connect all vertical and horizontal objects to the horizon line. See the image below.
You can draw houses, cars, roads, or any other 3-D object using this techinque! Make sure your vertical and horizontal lines are not leaning. This will take some practice.
In class, we will be creating a 'dream room' using one point perspective!
Tuesday, January 3, 2012
6th grade - Two Point Perspective
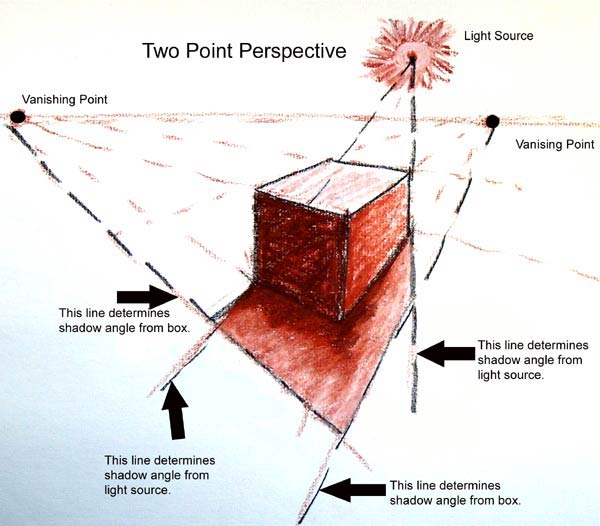
Two point perspective is the next step after you master one point perspective. This perspective happens when you are looking at an edge of an object. When this happens, the object appears to be connected to two vanishing points on the horizon line that are wide spread. Two point perspectivce actually looks more real to life than one point because people see things from an edge (called an oblique angle) more often than head on (as in one point perspective).
The image above demonstrates how to create 2-point perspective. Below is a drawing using two point perspective.
Since there is one point perspective and two point perspective, can there be more vanishing points?
YES!
Technically, you can use an infinite number of vanishing points. This works really well if the furniture in your room is not all lined up with the walls.
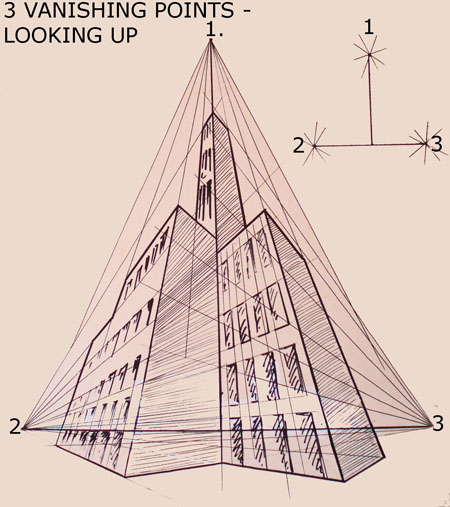
There is also something called 3 point perspective.
This is useful for drawing a skyscrapper from the viewpoint of a pedestrian on the sidewalk, or a sun shadow being cast by a building.
Friday, December 16, 2011
Mrs. Watson's still life
Of course, I won't ask my students to do something that I am not willing to do myself! Here is the still life I made while the students made theirs. This was done on a large sheet of gray paper taped onto the front board. I used crayon, so there was no erasing allowed for me! Fortunately for the students, they got to use pencils... and erasers!
Friday, December 9, 2011
proportion
Proportion means making sure each of the parts are the right size to be correct for the whole. The best way to describe it is to imagine you are drawing a picture of a person. If you were drawing a person, the arms should not be too long or too short. It means making sure the head is not too big or too small for the body. That sort of thing.
In class, each student selected an object out of the still life bins and practiced drawing in proportion. They practiced doing basic comparison measuring to try to get the sizes right. Comparison measuring means that you 'measure' the short side with your fingers, and compare that to the other sides. If the short side counts as 'one', and the long side equals 3 of that 'one', you know to make it 3 times longer than the short side.
To work on this at home, select simple objects in the kitchen to draw. A pot or pan works great!
Thursday, December 8, 2011
Shading a Ball reference photos
Here are some shots of the ball that the students looked at while learning to shade. As you can see, the angle of the light really affects how the shading needs to be done! If you want more practice, you can look at these photos and sketch in the shapes you see created by the effect of light and shadow.
Shading a Ball - Student Examples
Here are some 6th grade examples of shading a sphere. It is fun to look at all the different angles of light and shadow in each picture. This is due to the fact that the ball was placed in the center of the room, with all the students sitting around it. Everyone had a different viewpoint.
Tuesday, December 6, 2011
4th grade - Shading a ball
We started a shading lesson today. Shading involves the Element of VALUE. We also use the Element of SHAPE while working out where the lights and darks in the picture are placed.
I placed a playground ball on the center table in class and illuminated it with a lamp. We talked about using the Element of SHAPE to lightly sketch in the shapes formed by the shadow on the table, the shadows on the ball, and even the dull light bouncing up on the back side of the ball from the table.
Students had an opportunity to walk around the room and see how the shadow shapes change on the ball depending on the angle you are viewing it.
Wednesday, September 28, 2011
4th and 5th grade - Still Life - Student Examples
Last week, the fourth and fifth grade classes focused on some drawing and shading skills as they drew a simple still life in the center of the room. Here are some of the best student examples!
Thursday, May 13, 2010
The Portrait of My Son
Here is a collage showing the progression of the painting I did of my son. It is done with the very same oil pastels and techniques that the 6th grade students used. I hope to have images of their portraits posted soon! Looking closely, you can see that this technique is a lot like the old 'paint by numbers' paint sets where you simply filled in the shapes with the correct color. The trick is in deciding which colors (or values) should go in each space. We painted these portraits monochromatically to try to make those decisions on values/colors easier for the students.
The final painting is 16"X20" in oil pastel on gray pastel paper. He would probably like to have it titled "My Avatar", or "Smurf", but I named this painting "My Beautiful Blue Boy". Sorry, son. I know boys don't like to be called "beautiful", but you are beautiful to me.
Thursday, May 6, 2010
Pure/Modified Contour
Sixth graders ... Homework will be due next Monday! If you were absent the day this homework was assigned, read the rest of this post to learn what you are to do.
The sixth grade homework this week is to try out a training practice to help improve drawing skills. I call this a training tool, because it is not something an artist would do all by itself, but is good for improving skills. Think of it like all the exercises a sports team does during practice, or the exercises a ballerina does at the barre. Running 'ladders' in practice is not the same as playing in a game, but it helps an athlete with speed and quick reflexes. Plies done at the barre aren't done on stage, but they are neccessary for training technique into muscles.
So. This training tool is called 'Pure Contour' and 'Modified Contour' drawing.
First of all, what is a contour?
In art, a contour line is a line that represents the surface of an object. Some contour lines show the edges of objects. Others show how it curves or bends. In this assignment, contour lines should represent the edges of every detail of the object being drawn.
A 'Pure Contour' drawing is made by placing your pencil on the paper, then covering it with another paper so you cannot see what you are doing on the paper.
That's right! You are not supposed to look at your paper AT ALL for this part of the assignment. Instead, spend every moment looking VERY closely at all the details on the object. Draw every little detail!
Once you are sure you have drawn everything you can possibly see, slide your hand out from under the top paper; but DON'T PEEK at what you have done! Not yet!
Now it is time to make a 'Modified Contour' drawing. Draw the same object a second time on the top paper. This time, though, you are allowed to "peek" at your drawing on the paper from time to time to make sure the pencil is in the right place. Remember, though, that you should still spend MOST of your time looking at the object being drawn... not your paper.
After you have finished your 'Modified Contour' drawing, you can lift up the top sheet of paper. See how goofy the 'Pure Contour' drawing looks? Go ahead and laugh at it, I always do! It is not supposed to look good. It is supposed to help you see all the details you usually miss or skip over in your drawings.
And there you have it. Two drawings of the same object are due next Monday. One of the drawings should be done in 'Pure Contour' style, and the other in 'Modified Contour' style.
Monday, May 3, 2010
"Self Portrait" Teacher Example
Last year when the sixth grade made their self portraits, I chose to do a picture of my daughter along side them, so they could see me doing the same thing I assigned to them.
This year, I decided to to a picture of my son!
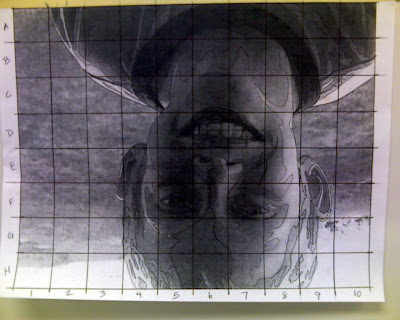
You can see a photo of my son in the top image. Notice that I used a pen to outline all contours... even where value changes occur! And, yes the photo is upside-down on purpose!
In the bottom photo, you can see that I am transferring the image one grid at a time onto a large gray paper that is taped to the front board in the classroom. You can't tell because both photo files are the same size on the web page, but the drawing in the bottom photo is actually twice the size of the original in the upper photo.

Subscribe to:
Posts (Atom)


+dig+pics+015.jpg)